After G&O closed (temporarily – they are back now!) due to the explosion in Greenwood my family bike had to go and get a flat. A flat? you ask. What’s so big about a flat? Just pull the wheel off and replace it. For any of my other bikes I’d say yes, I can totally fix my own flat, but unfortunately on the Yuba it’s just not that simple.
First of all, the wheel is bolted on. No biggie there, but at the time I didn’t own a socket set with long sockets to reach in there and undo the bolts. Second, there is an adapter in the dropouts to make the axel on the wheel fit. That’s the hangup right there.
So, since G&O was closed, I aired up the tire (thankfully it was a slow leak), and rode down to the shop I use all the time for my non-cargo-e-bikes. They are great and I highly recommend them, even though this story may make you question that opinion. But really, I trust them with all the rest of my bikes. They do good work. Still, I might not mention there name here just in case.
First, it took maybe half an hour for the mechanic to get the wheel off, replace the tube, and put the wheel back on. Okay, I thought, I guess it’s involved with this bike. I purchased a new tube and off I went. I got home, though, and heard that telltale sound of a brake rubbing. Every single time I’ve had a brake start rubbing suddenly on a bike it’s been because the axel wasn’t seated quite right. So I inspected the axel and noticed that yes, it wasn’t quite seated in the dropout properly. No big deal, I though, I can fix that. (At that point I didn’t know about the adapter.) I ordered some longer sockets (I need them anyway for other things) and managed to qualify for next day shipping from Amazon (Tacoma Screw was closed already and I didn’t want to drive to Home Depot). They arrived the next day and I went to work.
First I tried flipping the bike over to get better access to the wheel. Not a good idea – it tipped over. I guess what works for my Surly doesn’t work for a Yuba. Not too surprising in retrospect. So instead I did it right side up. I loosened the nut and began wiggling the wheel. I am not super mechanically minded, and it seems whenever I do something like this I just make things worse. It held true this time. I can replace a light switch in 10 minutes, install my own light fixtures, and build things out of wood, but as soon as I start working on anything mechanical I get stuck. When am I going to learn?
I posted to the local family biking group asking for advice. I got a ton of advice, but none of it was helpful. So I was still stuck with an unrideable bike. This is made worse by the fact that I have no way to transport said bike when I can’t ride it.
Thankfully two things came together. G&O let me bring it by a couple days before they were actually open, and my friend Mark offered his truck to haul it there. It still took me a week for the stars to line up and get there, but I was saved! Once I got it there, Donald was able to re-set the wheel in about 10 minutes. He showed me what had happened and that’s when I learned about the adapter. So, now I definitely am not replacing my own tire.
Unfortunately, this leaves me with the rather worrisome question of what to do if I get a flat halfway between home and Red Hook. I still haven’t figured that out. My best idea is to buy one of the air canisters with the patching goo in them and hope that keeps it inflated long enough to get home. I’m open to suggestions. I would love to learn how to take the wheel on and off, but then I’d have to haul around my socket wrench everywhere just in case. And I can’t do it at home anyway because my bike stand won’t hold the Yuba. I’m thinking the air canister is the bet bet, and certainly the quickest fix.
Of course, that wasn’t the end of it. I am beginning to think I have a gremlin infestation because it feels like things always come in twos or threes with this bike. When I left G&O the motor wouldn’t go. I turned around and with some jiggling of the throttle wire connector it was back up and running. I got home without incident. However, the next day it wasn’t working again. I jiggled everything I could find with no luck. So, I was bikeless until I could get up to G&O again for a repair.
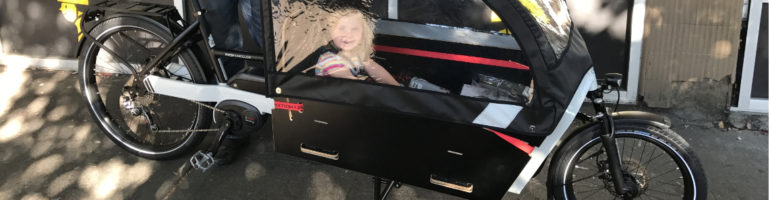
I forget why, but I couldn’t get in on the weekend and they are closed Monday and Tuesday, and then on Wednesday we were so busy I couldn’t make it then either. Finally yesterday I was able to get up there. Even better I had a babysitter so I could drop the roughly 25 pounds my daughter adds to what is already a pretty heavy bike. By zig-zagging through the neighborhood I was able to get up to the top of the ridge without trouble. I only had to stop once. I feel like I should really do that once a week for strength purposes. I’ve decided to race cyclocross this year and I need to get used to climbing. Quad strength here I come!
Tyler tracked the problem down to a bad throttle and replaced it on the spot. I was back up and running. While I was there I purchased a new seat for the bike. I’d been wanting to move R to the back ever since I saw she can reach the throttle. I had purchased a used Peanut Shell from a woman I met on the Burke-Gilman, but it was plagued with problems. Missing parts, some of which Davey at G&O helped me track down (thankfully I also tracked some down because it turned out neither of us had the full set), only to discover that one of the straps was missing a part making it non-adjustable and completely unsafe. I finally gave up.
Davey helped me pick out a seat and I bought it while I was there for the repair. I opted to install it myself because all it involved was bolting an adapter to the deck of my bike. Since it involved wood instead of mechanical parts I felt pretty confident I could do it myself. That night I spent an hour removing the Peanut and installing the Yepp. It went without incident. I followed good old Norm’s advice about measuring twice and cutting once and got my holes in exactly the right spots.
Today was the first time out riding with R on the back. I was a little nervous she might not like it as well as the front, but she was just fine. I did realize that carrying anything on my back isn’t really great, but luckily my backpack didn’t hit her in the face. Now I’m just hoping there is enough room behind the seat for my panniers… I didn’t even think to measure that! Cross your fingers for me.
The surprising thing about today wasn’t that R was fine, it was that I liked how the bike handles with her weight on the back better than when she’s on the front. The e-assist got us up the hill on the lowest power setting instead of the highest and I felt a little more in control. Best part though? I no longer have to splay my knees out when I pedal. It was necessity with her on the front and had spilled into my non-cargo biking, causing me significant knee pain when biking long distances. Now I can break that habit and hopefully be pain free!
